Notice:
The instructions provided below work in the Google Chrome or Mozilla Firefox web browser. If you are using Internet Explorer or another web browser, please do not contact support for assistance. You must be using Chome for Firefox for assistance from Just In Time Design.
Joomla websites developed by Just In Time Design use the JCE Editor. To insert an image into an article first open the article to be edited. You should now see the article with the JCE Editor Toolbar at the top of it.
Follow these steps to insert an image:
- Click on the left side of the article at the verticle position on the page that you would like to insert the image.
Note: If you want to position the image on the right side of the page, you will have that option later. - In the editor toolbar, click on the Insert/Edit Image button

- A pop-up box will open. If you're image is already on the server, click on the image name and proceed to step 4.
If you need to upload an image, follow these steps:
3a) Click on the upload icon button
3b) Click browse to the image on your computer and click the open button.
3c) Click Upload. When the image is done uploading, the page will indicate that it is completed.
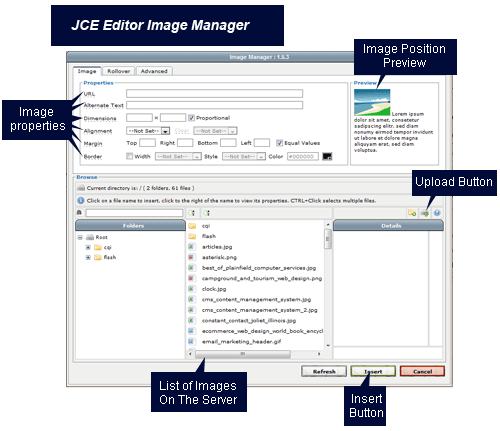
3d) Click the Cancel button and the image filename should now show up in the list of images. - Click on the image name and the URL, Alternate Text and Dimensions properties at the top of the pop-up box should populate (See the image below for where the image properties are). If they do not populate, click on the name of the image again.
The alignment option can be set to your desired position. You can see on the right side of the pop-up box how the image will be placed on the page.
Optional: We recommend adding 5px or 10px to the Margins of the image. This is so that the text on the page does not come up against the image.
Optional: You can also add a border to your image. Please note, if you are going to be linking your image to another page, you should set your border to 'none'.
Once you have set up your options, click the 'Insert' button at the bottom of the pop-up box.
If you follow these steps, you should be able to insert your image in a few short minutes.

Additional Resources:
- Shrink O' Matic - Resize your digital images in seconds. Shrink O Matic is an AIR application to easily (batch) resize (shrink) images. It handles JPGs, GIFs and PNGs. Simply drag and drop images and they'll be resized as you wish! Options allow you to choose the output sizes, names and formats.

